|
Comment
détourer une personne pour l'intégrer
sur le fond de votre choix ?
|
|
How to
put a character on a background
|
|
Ouvrir l'image avec le personnage
à détourer. Evitez les personnages
avec les cheveux ébouriffés !
|
|
Open your character's pic. Avoid
character with dishevelled hairs !
|
|
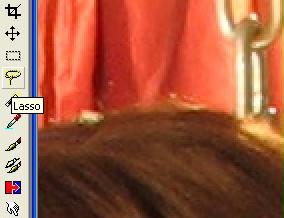
Utiliser l'outil LOUPE pour grossir
l'image jusqu'a un niveau satisfaisant pour detourer
le personnage dans ses détails.
|
|
Use the tool "MAGNIFYING
GLASS" to obtain an outline with significant
details.
|
|
Selectionnez l'outil LASSO.
|
|
Select the LASSO tool
|
|
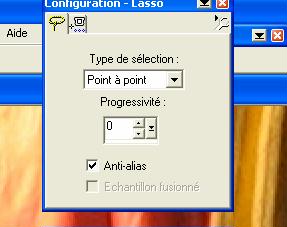
et dans la fenêtre de config
de l'outil, choisissez POINT à POINT.
|
|
And in its config window, choose
"POINT TO POINT"
|
|
Commencez le detourage en cliquant
(une fois) sans trop espacer les clics afin de respecter
les courbes et details. Attention a ne pas double-cliquer
sinon la selection serait fermée par le chemin
le plus court ! Faites le tour de votre personnage.
|
|
Begin with a simple "clic"
and do not put too much space between your clics
to respect the details. Do not double-clic otherwise
your selection would be closed with the shorter
way !
|
|
Une fois le tour du personnage
effectué, vous arrivez à nouveau au
sommet de la tête pour rejoindre votre 1er
CLIC.
|
|
When you have gone round your
character, you've reached your first CLIC.
|
|
Double cliquez et la selection
sera fermée, et clignotera sous la forme
de tirets.
|
|
Do a double-clic and your selection
wil be closed and will blink
|
|
Faites le menu EDITION puis COPIER.
c'est l'équilavent de CTRL + C
|
|
Open the pull-down menu EDIT then
COPY. It's like CTRL + C
|
|
Faites le menu EDITION puis COLLER
comme une nouvelle image. Equivalent de CTRL + L
|
|
Do the menu EDIT, then PASTE as
a new PIC. It's like CTRL + L
|
|
Vous obtenez une nouvelle image
avec le personnage détouré sur un
fond transparent figuré par le damier gris
et blanc.
|
|
You obtain a new pic of your character
and a background which is transparent.
|
|
Pour rendre transparentes les
mailles du tamis comme cela est déja fait
ci contre. Procedez comme suit.
|
|
To give transparency to the racket
like it is already done here. Do like that :
|
|
Selectionnez l'outil BAGUETTE
MAGIQUE et configurez le comme ci contre. La tolérance
sera a ajustée en fonction de votre image.
|
|
Use the MAGIC WAND tool and use
parameters like these. TOLERANCE will be ajusted
according to your pic.
|
|
Cliquez une maille. Si la selection
est trop grande, annulez et diminuez la tolérance.
Si la selection est trop petite, annulez et augmentez
la tolérance.
|
|
Clic to select an aera. If aera
is too much big, undo your selection and decrease
TOLERANCE parameter. If aera is too small, do the
opposite.
|
|
Quand la sélection vous
convient, appuyer sur la touche SUPPR et la selection
devient une zone de transparence. Repetez ceci pour
toutes les zones a rendre transparentes.
|
|
When aera selected is ok, press
SUPPR and your selection becomes a transparent aera.
Repeat that for all the aeras needed.
|
Enregistrez votre travail dans un fichier de
type PSP (Paint Shop Pro).
(Car dans un fichier JPG vous perdriez la transparence.)
|
|
Save your work as a PSP file (PaintShopPro).
With a JPG file, you loose the transparency.
|
|
Ouvrir votre image de fond.
|
|
Open your background pic.
|
|
Personnellement j'utilise l'outil
SELECTION pour définir la taille que doit
prendre mon personnage sur le fond.
|
|
In my case, i use the SELECTION
tool to define the size needed for my character
pic on the background.
|
|
Simulez une selection à
l'endroit ou votre personnage sera et observez la
mesure de hauteur ou largeur de votre selection
indiquée en bas à gauche de la fenêtre
PaintShopPro : en ce moment 80 x 238.
|
|
Simulate a selection where you
want to put your character and look at the height
or width at the bottom left of the PSP's window
: in this case it's 80 x 238.
|
Cliquez la barre de titre de la fenêtre
de votre personnage puis utilisez le menu IMAGE
et le choix REDIMENSIONNER pour adapter la taille
de l'image à celle choisie.
|
|
Select your character pic and
use the IMAGE (PIC?) menu then RESIZE with the correct
values.
|
|
Dans mon cas j'ai choisie une
hauteur de 400 pixels, la largeur en découle
car la case à cocher "garder la proportion"
est cochée.
|
|
In my case, it was a height of
400 pixels. The width is calculated because the
choice "keep proportion" is ON.
|
|
La fenêtre de votre personnage
étant active, utilisez le menu EDITION puis
COPIER (CTRL + C)
|
|
Select your character's PIC and
use EDIT menu then COPY (CTRL + C)
|
|
La fenêtre de fond étant
active (cliquez sa barre de titre), faites le menu
EDITION puis COLLER comme un nouveau calque
|
|
Select your background pic and
use EDIT menu then COPY as a new LAYER.
|
|
Votre personnage devient une selection
flottante sur l'image de fond.
|
|
Your chararcter can now be moved
by the mouse (floating selection)
|
|
Positionnement effectué.
|
|
Position done.
|
Si la liaison entre votre personnage et votre
image de fond vous semble trop marquée,
artificielle, trop visible...
Zoomez (LOUPE) la partie incriminée.
|
|
If the borders between your character and the
background seems to be artificial, too much clean
or visible...
Use the MAGNIFY GLASS then
|
|
Dans la mini fenêtre "Palette
Calques", selectionnez le calque de votre personnage.
|
|
In the Layers window, select your
character's layer.
|
|
Cliquez l'outil GOMME
|
|
Use the ERASER (RUBBER) tool.
|
|
et configurez le comme ceci. C'est
l'opacité à 40% qui est importante.
La taille et la forme de la gomme dependront de
votre image.
|
|
Change its parameters like this.
Opacity near 40% is important. Size and shape of
the rubber will be according to your pic.
|
|
Passez la gomme par CLICs continus
par CLIC successifs sur le bord de la chaussure.
Ici je souhaitais salir la belle chaussure blanche
est peu trop clean !
|
|
Use the rubber by simple clics
or permanent clic on the border. Here i wanted to
make the shoe dirty with the colors of the background.
|
|
Quand vous êtes satisfaits
de votre image finale. Sauvegardez la sous la forme
d'un fichier PSP pour des retouches futures. Puis
utilisez le menu CALQUES puis FUSIONNER : fusionner
tout(aplatir)
|
|
When you are satisfied with your
pic, save it like a PSP file for future work.
Then use the LAYERS menu then MERGE to obtain a
flat pic.
|
|
Et enfin sauvegardez votre travail
sous la forme d'une image JPG pour la partager sur
le web.
|
|
Save your work as a JPEG pic to
share it on the web.
|