|
|
| |
|
Website's introduction |
|
|
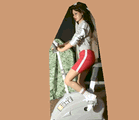
You are on the website of a realdoll
named Elle. She is a life size mannequin done
with a silicone near to human skin and with a
skeleton allowing her to take realistic poses...
more
|
|
|
And ... |
|
|

Sign her guest book
|
|
|
|
|
|
|
|
| |
| |
|
Tutorial
for creating small anims
|
|
the animation to create
:

|
phase 1 : The photoshoot
There are 8 different frames. I considered
the crank gear as a clock and took 8 photos by changing
the position of the legs to figure 8 different times
on the clock. More photos = a more freely animation
but a bigger file's size too.
Of course the camera must be on a tripod
and must not move during the whole photoshoot (neither
the bike), It's more easy to use a remote command if
possible. Only the body's parts of the model, used in
the animation should move.
|
Phase 2 easy : simple conversion
of the JPEG files to GIF files
|
Etape
|
Paint Shop Pro 7
|
Photoshop
|
| Resize the photos to
obtain a file easy to freely animate (407 x 350
pixels in my case) |
shift + S
type the new size
|
Menu "pic", choice "size
of the pic"
type the new size |
| Decrease the number
of colors to 256 |
will be done when saving.
|
will be done when saving.
|
| Save the file as a
GIF file |
F12
type of file = GIF
|
menu "file", choice "save
as "
type of file = Compuserve GIF |
It's easy but the animation
will be bigger because the 8 files are complete and
use redundant parts.
|
Phase 2 more difficult : conversion
from JPEG to GIF but saving only the parts of a pic
which really change.
|
Etape
|
Paint Shop Pro 7
|
Photoshop
|
| Resize the photos to
obtain a file easy to freely animate (407 x 350
pixels in my case) |
shift + S
type the new size
|
Menu "pic", choice "size
of the pic"
type the new size |
| Save the first file
as a GIF file |
F12
type of file = GIF
|
menu "file", choice "save
as "
type of file = Compuserve GIF |
| For all
the next pics: |
|
|
| Select the part of
the pic which changes (better more than less) |
tool LASSO, mode "point to point"
double click to close the selection. |
|
| Invert the selection
|
shift + Ctrl + I
|
|
| Decrease the number
of colors to 256 |
shift + Ctrl + 3
|
|
| define the transparency |
shift + Ctrl + V
select the choice "background color"
|
1) menu "Layer", choice
"duplicate layer", creates a background
copy.
"Background copy" layer must be active
in the window of Layers.
2) selection of the changed part of the pic : tool
"LASSO"
3) menu "selection", choice "invert"
4) key "delete" to delete the selection
becoming transparent.
5) Right clic on the "Background" Layer
and choice "delete layer"
|
| Save the file as a
GIF file |
F12
type of file = GIF
|
menu "file", choice "save
as "
type of file = Compuserve GIF |
| Repeat for the next
pics |
|
|
| |
|
|
| |
|
|
|
Now you've 8 GIF pics on your
hard disc, one for each photo you've taken.
|
|
|
creation
of the animation
I can't help you more with this
creation because i don't know the software you
use. In my case, i use
Jasc Animation Shop, which is on the same package
than PaintShopPro and this animation software
is very simple because it offers a Menu which
helps you step by step in creating the animation
(from the opening of the 8 Gif pics to the saving
of the final file). You only need to read and
to click.
Here's the magical menu (in french):

And after some clicks, the animation
is ready :

|
ASK FOR HELP HERE IF NEEDED ;)
|
| |
|